logo

Call Us

845-592-8480

Your Hudson Valley Hardscape Contractor 

Request A Quote

Your Hudson Valley Hardscape Installation Experts

When it comes to bringing your hardscape project to life, Performance Lawn And Landscaping is the preferred partner you've been searching for in the Hudson Valley. Our reputation as hardscape installation experts is built on a foundation of transforming visions into reality, creating outdoor spaces that not only meet but exceed your expectations. With us, your property is set to embody the pinnacle of beauty and functionality. Our team, equipped with unparalleled expertise and a keen understanding of the unique landscape of the Hudson Valley, is dedicated to selecting the perfect materials and designs that ensure longevity and aesthetic harmony with your home. From sophisticated patios and robust retaining walls to welcoming walkways, Performance Lawn And Landscaping is your go-to source for making any hardscape dream a tangible, stunning reality, enhancing your property's charm and value.

Hardscape Services We Offer

Patio Design

Retaining Walls

Walkway Design

Outdoor Lighting

Landscape Design

Outdoor Living

Our Installation Process

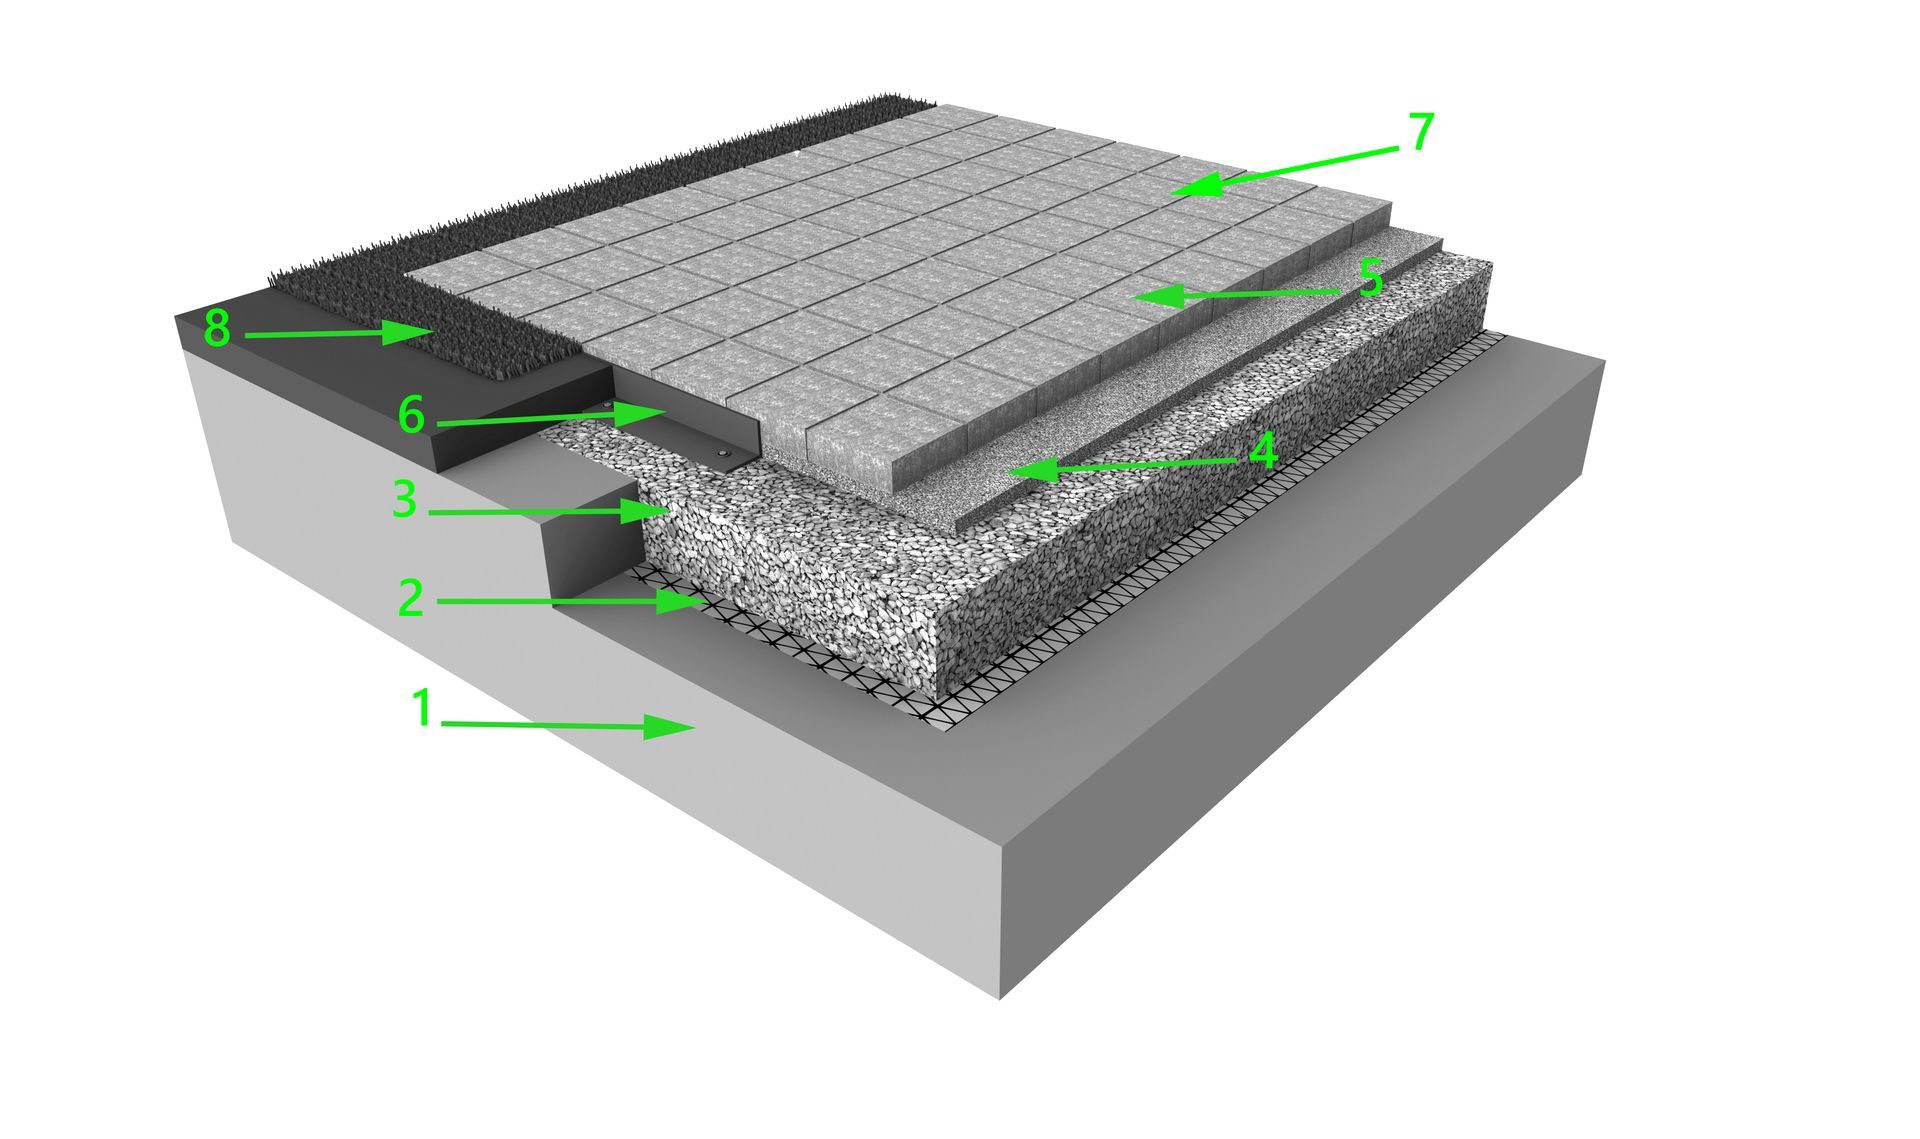
Although all projects are unique, a guaranteed quality installation is not. No matter what paver or stone you choose, they must all be installed on a base that will stand the test of time. Proper base installation is the key to any and all jobs. Our installation methods meet and exceed the industry standard practice, and are recommended by leading manufacturers such as Unilock.
Step 1

Testing/ Classifying Base Soils

Determining the soil type -sandy, clay, or loamy - is critical for ensuring proper base depth, drainage requirements, and the required modifications to those soils to allow them to support the project for years to come. After we know what type of soils are present we begin excavation - proper excavation methods and equipment are important for the efficiency and quality of the job. The grades that are set at this stage are important to the drainage of the base and the stability of the subsoil. Soil modifications required from step one are completed at this time.

Step 2

Geotextile/ Grid Layer

The first step for a successful base is the use of a stabilization fabric or grid. The purpose of this layer is to keep separate the base gravels and subsoil, as well as to help spread the weight of the patio across the subsoil.

Step 3

Installation of Base Gravel

Our paver and retaining wall bases are constructed using 3/4" crushed clear stone, compacted in proper "lifts" to ensure maximum compaction. The use of clear drainage stone for the base provides maximum drainage capabilities and results in no settling or heaving due to frost.

Step 4

Screeding the Setting Bed

After the base is properly installed, the setting bed is installed over top. To achieve accurate drainage, our bedding layers are installed using a laser transit ensuring all grades are spot on. We use a 1/4" crushed clear stone for our setting beds, providing maximum drainage, and eliminating washout, anthills, and settling that can happen with sand. Stone dust is NOT an approved material for any hardscape installation and should always be avoided.

Step 5

Paver Installation

The pavers are now installed, working from multiple pallets to provide a proper color blending throughout the job as variations do exist between pallets of the same color. This is where the project really starts coming to life.

Step 6

Edge Restraints

After the pavers are laid and cut to the final shape, the edge restraints are installed. A typical installation will use high-performance HDPE edging with 10-12" spikes to hold it in place. Other options can be granite or concrete curbing. Proper installation of the edging is critical to keep pavers from separating/shifting during use.

Step 7

Polymeric Sand

After edging is installed the pavers receive the initial compaction to settle them in place. After the first pass with the compactor, polymeric sand is swept into the paver joints and followed by another pass with the compactor to settle the sand and "lock up" the pavers to one another. More polymeric sand is then swept in to top off the joints. A blower cleaning of all stray sand particles and residue is completed, and the sand is finished with a water application to the manufacturer's specifications to activate the sand additives, creating a tight, solid joint.

Step 8

Lawn/ Landscape Repair

The final step in our project is repair/ installation of the surrounding area. This is where necessary grading around the pavers is completed to help divert water if needed. Your newly installed patio or walkway can now be enhanced with plantings and landscape lighting to complete the ultimate outdoor experience.

Testimonials

Request A Quote

Share by: